If you have worked with custom post types and wanted to have some custom fields added and displayed in the main admin table, you have probably faced the problem.
You will need to have the exact value displayed in the table column if you want this column to be sorted or filtered.
The Example
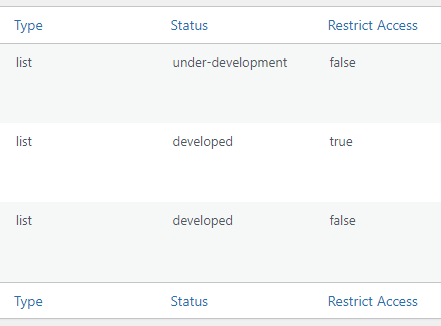
For example, let’s say you want your CPT to have a custom field where you want the user to check if the post can be accessed publicly or only for logged-in users.
You will have a checkbox with true/false values stored as a custom field in the database.
So in the main table, if you want to show, sort, or filter this value with manage_{custom_it would help if yout_type}_posts_columns, manage_edit-{custom_post_type}_sortable_columns or restrict_manage_posts then you displayed the true/false in the table since all of the methods above search table cells text content.
From the programmer’s point of view, that’s perfectly fine, but from UX or end-user perspective, that is not very user-friendly.
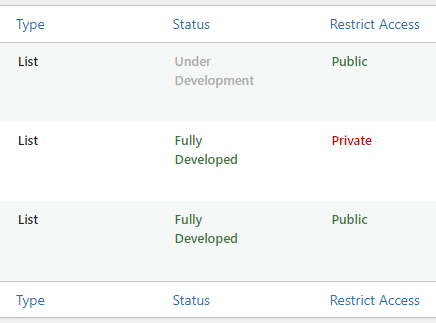
You want to have a Yes/No text shown instead of the true/false text.


The Solution
This two-part solution uses CSS and JS, but you can probably do the same with only JS.
Note: Only a CSS solution isn’t possible since the :contains() pseudo-class was removed from the CSS specs some time ago.
First, a for loop searches all the custom columns within your main table and adds the text content as an data-value attribute.
$.each( $( 'td[class*="column-{custom_post_type}"]' ), function( _, column ) {
  $( column ).attr( 'data-value', $( column ).text() );
});
The above will convert the table cell from <td class="restrict_acces column-{custom_post_type}_restrict_access" datacol-name="Restrict Access">false</td> to <td class="restrict_acces column-{custom_post_type}_restrict_access" datacol-name="Restrict Access" data-value="false">false</td>
Once the above is added, we can add CSS magic to hide the search column text and replace it with something more user-friendly.
For this, we will use the :before pseudo-class.
You can either replace the existing text with an icon, background image, or other text.
.hentry .column-{custom_post_type}_restrict_access {
  font-size: 0;
}

.hentry .column-{custom_post_type}_restrict_access:before {
  margin: 10px auto;
  font-size: 13px;
  line-height: 21px;
  font-weight: 500;
  white-space: pre-wrap;
}

.hentry .column-{custom_post_type}_restrict_access[data-value="true"]:before {
  color: green;
  content: 'f12a';
}

.hentry .column-{custom_post_type}_restrict_access[data-value="false"]:before {
  color: red;
  content: 'f153';
}
This approach will make our table cell text more user-friendly and won’t break the core WordPress functionalities. As I mentioned above, you can use text or even a user background-image to show an SVG image instead of the true/false values in the content.
I hope this one was helpful and saved you some time wondering how to replace custom admin values.
‘Till the next time.


