


Do you have a startup or launching a new product and would like to set up a feedback forum?
Fider is your perfect solution.
This will be where your first and regular users can get you some valuable feedback and suggest new features for your product.
Introduction
I will show you how to set up the Fider app for free with a custom domain name and deploy it on Heroku.
You can always pay for their cloud service, but if you are a startup with limited capital, you probably want to save as much as you can.
There are a couple of methods to deploy the app, but I will use Heroku for this article. You can also deploy the app on Azure or Docker as well.
In addition, for e-mail sender, you can choose between SMTP Server or Mailgun, and for the example below, I will use Mailgun.
Register
You need to create three free accounts if you haven’t already registered yet.
GitHub Setup
You need to create a copy of the app to have the latest release available in your GitHub account.
Go to https://github.com/getfider/fider and click on the Fork button.
You need to be logged in to your GitHub account.
Mailgun Setup
- Login to your Mailgun account.
- Go to Setting > API Key and save the Private API Key in a text file.
- Go Sending > Domains > sandbox*****.mailgun.org and copy the domain in the text file.
- On the sidebar under Authorized Recipients add an email address you will use for you Fider administrator account (you need to go to your email box and verify the email as well).
Heroku Setup
Once Mailgun is set up, it is time to deploy the Fider app on Heroku.

- Login to your Heroku account and Create a New App with a
unique-handle. - Go to Resources and add Heroku Postgres add-on, use Hobby Dev – Free plan.
- Go to Settings and under Buildpacks add
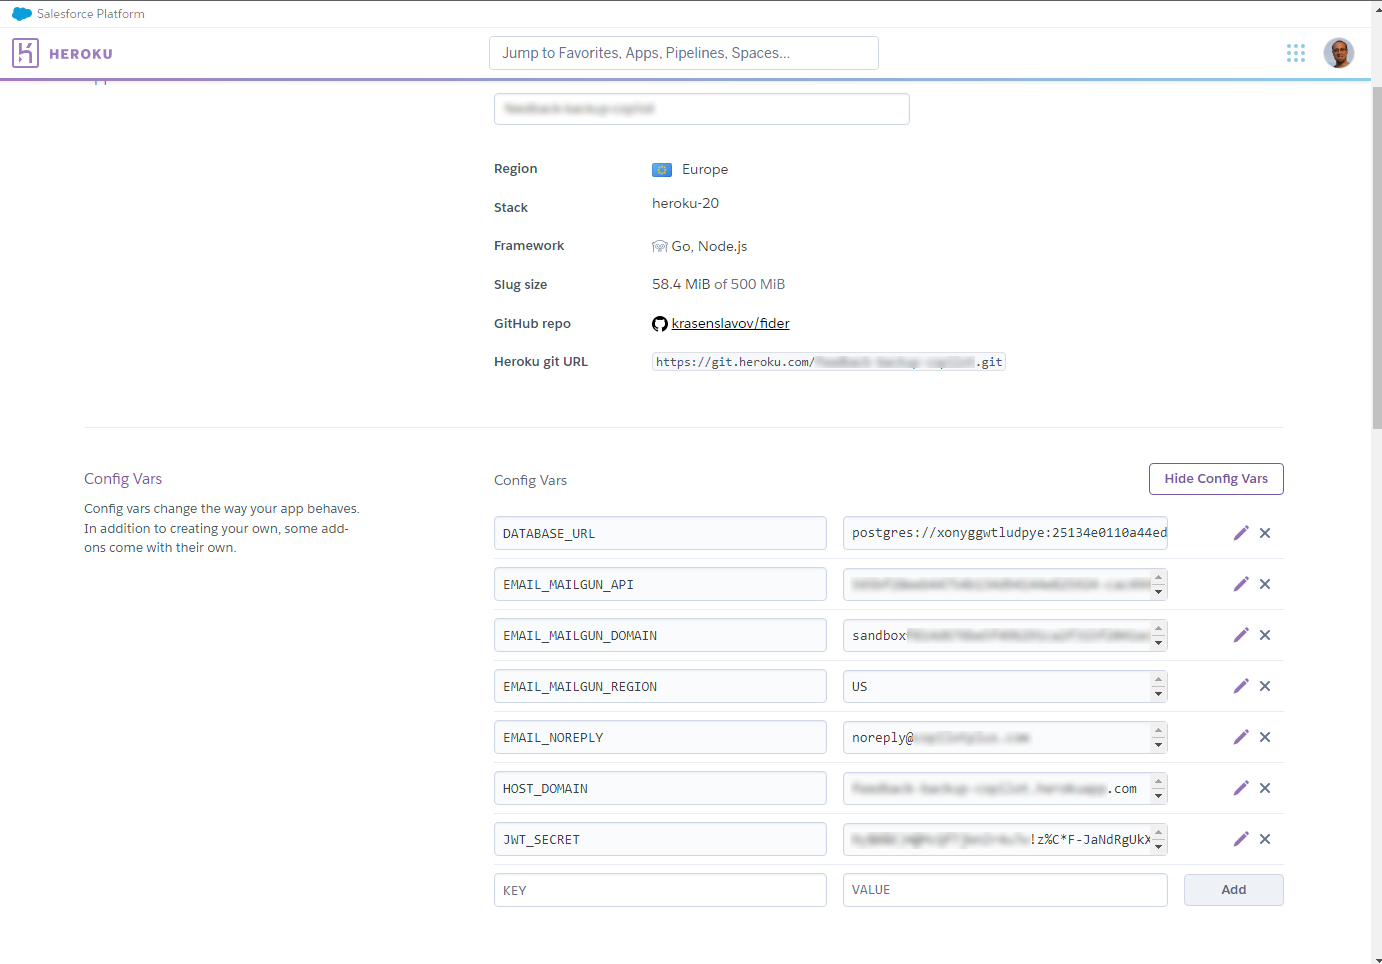
goandnodejs. - Stay in Settings and click on Reveal Config Vars.
Add the following configuration variables (don’t remove DATABASE URL)
- EMAIL_MAILGUN_API –
565**********************... - EMAIL_MAILGUN_DOMAIN –
sandbox*****.mailgun.org - EMAIL_MAILGUN_REGION –
US(the other option is EU, be sure that the sandbox has the same US or EU flag next to it) - EMAIL_NOREPLY –
noreply@domain.com - HOST_DOMAIN –
app-unique-handle.herokuapp.com - JWT_SECRET –
!A%D*G-KaPdSgVkXp2s5v8y/B?E(H+MbQeThWmZq3t6w9z$C&F)J@NcRfUjXn2r5Go to Encryption Key Generator and generate a token.
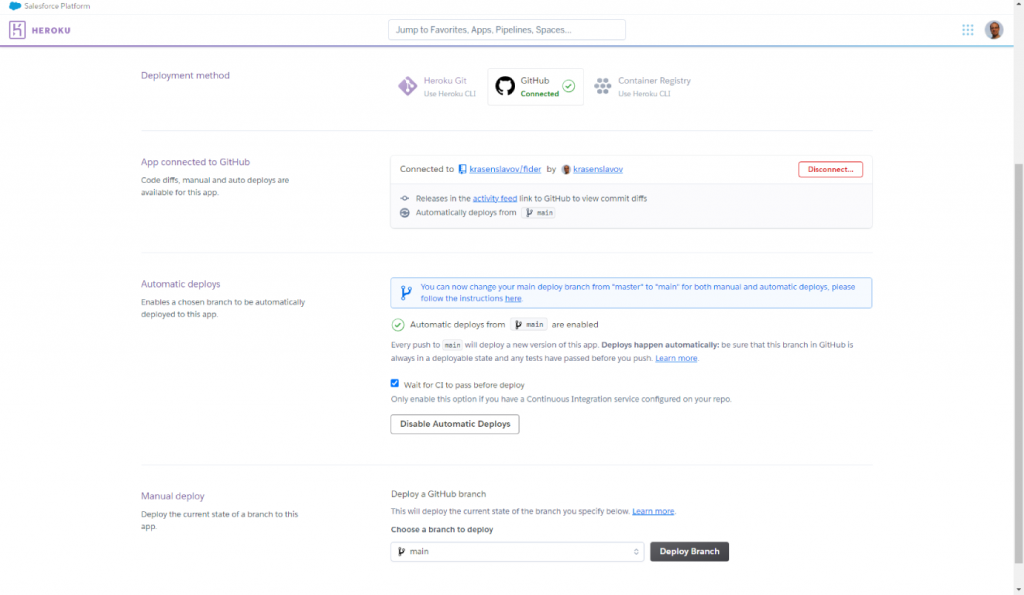
5. Go to Deploy and click on GitHub Connect. Once you authorize the access, you can search your repository and add the copy you created earlier for fider.
6. Lastly, you can scroll down the Deploy page, Enable Automatic Deploys, and click Deploy Branch on the main branch.
After a bit, you will be prompted with the View button, which will take you to your Fider app administrator Sign Up page.
Remember to use the Authorized Email you earlier added to Mailgun
Once you confirm the email, you will be logged as administrator and also set up and customize Fider.
Note: To keep your app copy up to date, you can update you from time to time.
Heroku Domain Setup
If you want to use your own domain and not app-unique-handle.herokuapp.com, you need to add a credit card to Heroku.
Setting up custom domain names is still free on Heroku, but they require CC.
"Domains can be added to both free and paid Heroku apps
and adding domains does not incur extra charges. For verification
purposes, you must verify your Heroku account to add domains to
apps."- Once you add your CC, go back to your Heroku app Settings page, scroll down to Domains and click on Add Domain button.
- Add your domain or subdomain and Save the DNS Target in a text file.
- Go to your domain name and Add a New ALIAS/CNAME DNS Record.
This is standard procedure, but you can search the docs for your own hosting/domain provider on how to do it since they all have different user interfaces.
Another thing is if your domain and hosting are the same, you need to add the DNS records at your Hosting provider, not your domain name.
The following example will point your app-unique-handle.herokuapp.com to feedback.domain.com.
feedback 3660 IN CNAME the******.herokudns.comNote: You may need to wait a couple of hours for the DNS changes to happen. They aren’t usually instantaneous.
Remember to change the HOST_DOMAIN variable from app-unique-handle.herokuapp.com to feedback.domain.com
Here is an example setup following the above I did for my new WordPress plugins, Backup Copilot.
What’s Next?
You will probably want to add an SSL certificate. This is done again via the Settings page, and you can choose to set up your certificate manually (e.g., issue by your hosting provider) and automatically manage it by Heroku.
You can do that easily via Settings once you upgrade your account from Free to Hobby, which is $7USD/mo.
‘Till the next time.