


This quick tutorial will show you how to send custom emails to your registered users using the wp_mail() function.
- Create your own email templates.
- And learn how to overwrite the system user emails when you have new user registration, password change or email confirmation after a successful registration.
So, let’s not waste any more time and dive right into it.
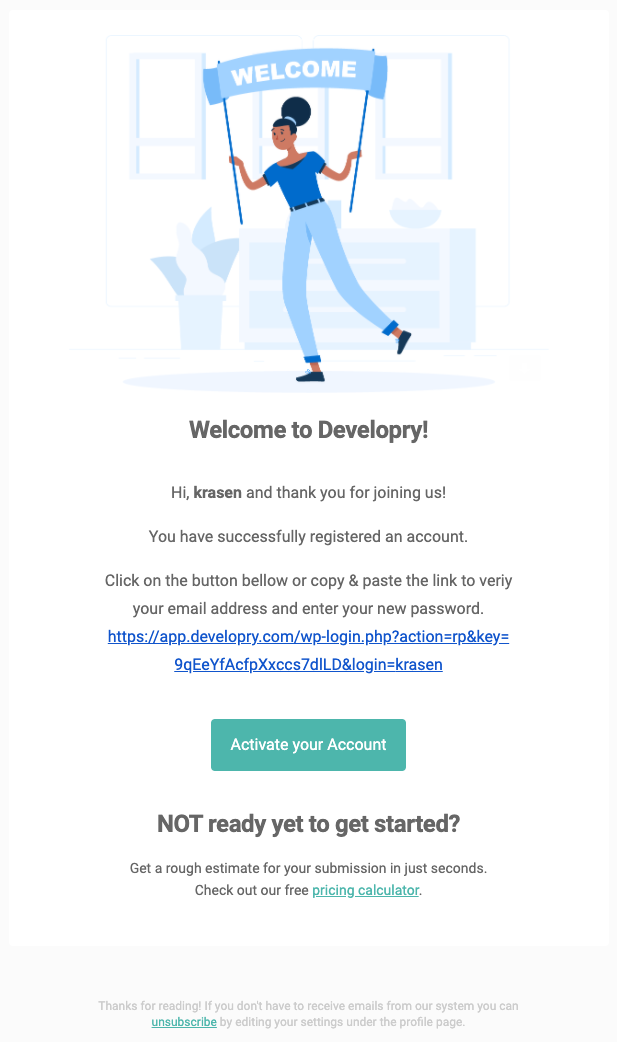
See here a custom new registration email I have created for one of my sites using the approach below.
The Template
First, you need to have some generic HTML templates for your emails.
Not going into much detail here, but there are a couple of tips while you code your HTML template.
- Use XHTML 1.0 transitional doctype with tables and inline styles, this way you will be sure that your email template looks good on different email clients.
- Load your images from a CDN, not your server.
- If you load a font from Google font, as I do in this tutorial, limit the font to only one with no more 2 styles (e.g normal and bold).
Note: You can have as many different email templates. For simplicity for this tutorial, I decided to go with one generic template for all of our emails. It is still flexible, but you have to create/load multiple templates if you need more.
The Code
Once we have our email template, we need to create a couple of functions to handle our emails.
The first function would be used to send an email within your system. You can specify an email address if you want to send an email to non-registered users. By default, this function will look for a WordPress user.
The second function would overwrite existing email functionality like new user registration or password reset emails.
Note: I tried to keep these functions as simple as possible so you can extend and customize them to meet your needs. However, the same approach could be applied to many different scenarios.
The Actions
We are all set up and ready to use our newly created custom email feature. To do that, we need to create a couple of action hooks.
The first one would use our compose_email() function and will overwrite an email when a registered user requests a password reset within our system. And the second action will overwrite the email when we have a new user registration.
Both actions are very similar. The only difference is that we need to create and return the new email contents when we overwrite the existing WordPress functionality for new user registration.
Note: We also need to specify the content type for our emails, text/html. By default, WordPress is set to send text-only emails.
Bonus: In some cases, you may want to disable system emails sent on password change to avoid duplicates.
add_filter('send_password_change_email', '__return_false', 10, 1); // users
add_filter('send_email_change_email', '__return_false', 10, 1); // admin
What’s Next?
You can use the above approach to send custom emails anywhere within your system. I didn’t have an example in this tutorial, but you can use the compose_email() function without relying on any existing WordPress functionality or having a registered user.
‘Til the next time.